
Apollo 17 Lunar Orbit Flown Photography Chart Maps
Apollo 17 lunar orbit flown photography chart maps from the collection of Commander Gene Cernan. The maps were used by the crew to guide their photographic efforts during the last mission to the Moon.
Out of stock
DESCRIPTION
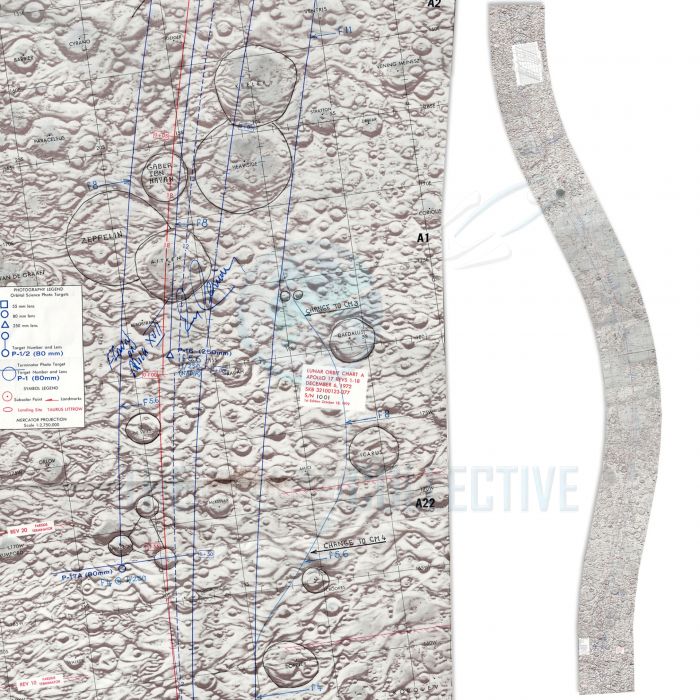
Apollo 17 photography chart maps flown to the moon aboard the Command Module "America" during Apollo 17 in December 1972 and used by the crew to guide their efforts in photographing areas of the lunar surface for study.
The chart is identified by the legend box as "Lunar Orbit Chart A, Apollo 17 REVS 1-18, December 6, 1972, SKB 32100123-377, S/N 1001, 1st Edition October 18, 1972." The highly detailed moon chart was primarily used for photography and is annotated in an unknown hand to indicate f-stop and exposure times at various points along the orbital path. The maps also identify hundreds of lunar landmarks, with orbital paths and further photography information indicated. The chart, which is marked with symbols that include the orbital path, photography legend, and various lunar surface features, shows part of an area of the lunar surface that the crew would cross over during orbital revolutions 1 through 18 for both the front-side and the back-side of the moon. Background coloration also indicates variance in the reflectance of lunar areas under full illumination.
Product Information:
- Select your desired chart map
- Each individual chart map measures approx. 13" x 8"
- Includes a copy of the Apollo 17 stowage list with the chart highlighted
- Includes certificate of authenticity with holographic logo and company stamp
Available Map Plates:
- Map A1 - Exhibits numerous hand-circled craters of photographic interest including Daedalus, Icarus, Zeppelin, Aitken, and De Vries, as well as handwritten photography routes, Hasselblad camera lens and angle instructions, photography legend, and map identifier bearing the serial number "1001." Signed & inscribed with "Flown on Apollo XVII / Gene Cernan." This chart can come attached to A2 or A22.
- Map A2 - Exhibits two large hand-circled craters of photographic, Keeler, and Heaviside, as well as the hand-drawn and written Gaber Ibn Hayan, Old Rim, and handwritten Hasselblad camera lens instructions.
- Map A3 - Exhibits two specifically highlighted areas of photographic interest, Bright Baby and the Star of Chaplygin, the latter being followed by handwritten Hasselblad camera lens and angle instructions. Also present are handwritten and circled craters of Ibn Khldun, Agassiz, Marconi, and Chaplygin.
- Map A4 - Exhibits the Necho and Roosa handwritten and circled craters, the latter named for the Apollo 14 Command Module Pilot Stuart Roosa.
- Map A5 - Exhibits the handwritten and circled Arabia crater that spans the entirety of the surface area, followed by the smaller Eskola crater. Also specifically highlighted is the TKM Flown above the Lobachevsky crater and the handwritten note "Rays from Giordano Bruno."
- Map A6 - Exhibits a specific hand-drawn area of photographic interest, Rooster Tail, as well as the upper encirclement of the Arabia crater. Also present is Smyth's Sea in the upper-left corner, a lunar mare located along the equator on the easternmost edge of the Moon's near side.
- Map A7 - Exhibits the Hubble crater on the lower-right side named for the famous American astronomer Edwin Hubble, and Goddard crater further south, named after the pioneering rocket scientist Robert H. Goddard.
- Map A8 - Dominated by two-thirds of the Sea of Crises lunar landmark, a lunar mare located in the Moon's Crisium basin, just northeast of the Sea of Tranquility. This map would pair beautifully with A9 as it would show the entire Sea of Crises.
- Map A9 - Exhibits the upper-third part of the Sea of Crises, north of Mare Tranquilititus. This map would pair beautifully with A8 as it would show the entire Sea of Crises.
- Map A10 - Exhibits the official Apollo 17 landing site of Taurus Littrow circled in red, noted with 17-1 (REV 12). Also present are handwritten Hasselblad camera lens and angle instructions surrounding and south of the Lunar Module landing site.
- Map A11 - Exhibits two specific areas of handwritten Hasselblad camera lens and angle instructions, including hand-drawn ridge and ray photographic obstacles. Also present in the upper-left corner is the Julius Caesar crater, an 85km wide lava-flooded lunar impact crater with a low, irregular, and heavily worn wall, named after Roman Dictator Julius Caesar.
- Map A12 - Exhibits the Apollo 15 landing site of Hadley Rille, clearly indicated with an arrow in the lower-right corner. Also highlighted by hand is an area of photographic interest, D Caldera, just south of Hadley Rille.
- Map A13 - Exhibits numerous handwritten and drawn photographic instructions forming a clear sequence of events covering the primary area of interest in the region, Copernicus crater, named after the famous Renaissance astronomer Nicolaus Copernicus. Also present is a handwritten impact area west of the crater, reading "May 13, 1972, Impact 100m, Bright Halo Crater."
- Map A14 - Exhibits the Apollo 16 SIVB impact site in the lower-left corner, boldly hand-written and highlighted with "Apollo 16 SIV-B Impact 40m Dark Halo Crater." Also present in the Kepler crater range is a handwritten photography instruction.
- Map A15 - Exhibits numerous handwritten and drawn photographic instructions forming a clear sequence of events to be taken from the Suess crater to the Reiner R crater to a specific circled area over the Ocean of Storms.
- Map A16 - Exhibits the Darwin crater, a walled plain lunar impact crater named after the naturalist, geologist, and biologist Charles Darwin, famously known for his Theory of Evolution. Also present is a handwritten instruction east of the Grimaldi crater.
- Map A17 - Exhibits a printed 1:2,750,000 scale south of the Lake of Autumn crater and the Darwin B crater in the lower-left corner of the map, also named for Charles Darwin.
- Map A18 - Exhibits boldly printed 80mm and 250mm photographic Hasselblad camera tilt instructions over the Rook Mountains, a ring-shaped mountain range that lies along the western limb of the Moon, crossing over to the far side, completely encircling Mare Orientale.
- Map A19 - Exhibits a printed 1:2,750,000 scale and boldly printed Hasselblad camera tilt instructions. Also present in the top-right corner is Lucretius crater, a relatively fresh impact, with the well-defined rim and interior remaining nearly unscathed from impact erosion.
- Map A20 & 21 - Combined map featuring the sextant photography shutter speed chart, detailing the Hasselblad camera lens configuration. A handwritten Hasselblad camera instruction is also present north of the chart, providing clear relevance to the chart below, as well as the Barringer crater in the top-left corner, a lunar impact crater that is located on the southern hemisphere on the Far side of the Moon, named after geologist Daniel Barringer.
- Map A22 - This chart map exhibits numerous hand-circled craters of photographic interest such as Doppler, Crookes, and the Sniadecki trio, as well as handwritten photography routes, Hasselblad camera lens, and angle instructions. The map exhibits the taped horizontal separation that held the entire chart together. This chart can come attached to A20 & 21 or A1.
Purchasing Multiple Chart Maps:
If you would like to purchase multiple maps and do not want them separated into individual plates (i.e., A5 & A6 adjoining), please send an email to richard@thespacecollective.com after placing your order, and we will arrange for the chart map to be sent to you joined together. Please note that all adjoining maps are in sequence (i.e., A1, A2, etc.) except for A1, which can be paired with A2 or A22. All other maps can join to their corresponding section, i.e., A5 connects to A4 & A6.
Condition Report:
Each chart map is in pristine condition with minor tape marks on the reverse from the original tape sections used to hold the chart together to provide stability during mission use. Minor tape bleedthrough is present on maps A3, A5, A7, A11, A15, A17, A19, A21, and A22 but does not detract from the overall aesthetic.
Authentication Information:
These Apollo 17 flown chart maps came from the collection of Mission Commander Gene Cernan. One section (A1) of the chart is hand-signed and flight-certified in blue felt tip, "Flown on Apollo XVII / Gene Cernan." The chart is identified in the legend box and bears the serial numbers "SKB 32100123-377, S/N 1001," which correspond with those found in the Apollo 17 stowage list, which will also be included with each map plate.
Lifetime Guarantee of Authenticity:
All of our artifacts are thoroughly and extensively researched before being listed for sale, so much so that we're proud to offer a lifetime guarantee of authenticity for this and other artifacts listed on our website. We also hold a record of every piece we sell, which can be identified and searched in our online database using the serial number listed on your certificate of authenticity.
Description
Apollo 17 photography chart maps flown to the moon aboard the Command Module "America" during Apollo 17 in December 1972 and used by the crew to guide their efforts in photographing areas of the lunar surface for study.
The chart is identified by the legend box as "Lunar Orbit Chart A, Apollo 17 REVS 1-18, December 6, 1972, SKB 32100123-377, S/N 1001, 1st Edition October 18, 1972." The highly detailed moon chart was primarily used for photography and is annotated in an unknown hand to indicate f-stop and exposure times at various points along the orbital path. The maps also identify hundreds of lunar landmarks, with orbital paths and further photography information indicated. The chart, which is marked with symbols that include the orbital path, photography legend, and various lunar surface features, shows part of an area of the lunar surface that the crew would cross over during orbital revolutions 1 through 18 for both the front-side and the back-side of the moon. Background coloration also indicates variance in the reflectance of lunar areas under full illumination.
Product Information:
- Select your desired chart map
- Each individual chart map measures approx. 13" x 8"
- Includes a copy of the Apollo 17 stowage list with the chart highlighted
- Includes certificate of authenticity with holographic logo and company stamp
Available Map Plates:
- Map A1 - Exhibits numerous hand-circled craters of photographic interest including Daedalus, Icarus, Zeppelin, Aitken, and De Vries, as well as handwritten photography routes, Hasselblad camera lens and angle instructions, photography legend, and map identifier bearing the serial number "1001." Signed & inscribed with "Flown on Apollo XVII / Gene Cernan." This chart can come attached to A2 or A22.
- Map A2 - Exhibits two large hand-circled craters of photographic, Keeler, and Heaviside, as well as the hand-drawn and written Gaber Ibn Hayan, Old Rim, and handwritten Hasselblad camera lens instructions.
- Map A3 - Exhibits two specifically highlighted areas of photographic interest, Bright Baby and the Star of Chaplygin, the latter being followed by handwritten Hasselblad camera lens and angle instructions. Also present are handwritten and circled craters of Ibn Khldun, Agassiz, Marconi, and Chaplygin.
- Map A4 - Exhibits the Necho and Roosa handwritten and circled craters, the latter named for the Apollo 14 Command Module Pilot Stuart Roosa.
- Map A5 - Exhibits the handwritten and circled Arabia crater that spans the entirety of the surface area, followed by the smaller Eskola crater. Also specifically highlighted is the TKM Flown above the Lobachevsky crater and the handwritten note "Rays from Giordano Bruno."
- Map A6 - Exhibits a specific hand-drawn area of photographic interest, Rooster Tail, as well as the upper encirclement of the Arabia crater. Also present is Smyth's Sea in the upper-left corner, a lunar mare located along the equator on the easternmost edge of the Moon's near side.
- Map A7 - Exhibits the Hubble crater on the lower-right side named for the famous American astronomer Edwin Hubble, and Goddard crater further south, named after the pioneering rocket scientist Robert H. Goddard.
- Map A8 - Dominated by two-thirds of the Sea of Crises lunar landmark, a lunar mare located in the Moon's Crisium basin, just northeast of the Sea of Tranquility. This map would pair beautifully with A9 as it would show the entire Sea of Crises.
- Map A9 - Exhibits the upper-third part of the Sea of Crises, north of Mare Tranquilititus. This map would pair beautifully with A8 as it would show the entire Sea of Crises.
- Map A10 - Exhibits the official Apollo 17 landing site of Taurus Littrow circled in red, noted with 17-1 (REV 12). Also present are handwritten Hasselblad camera lens and angle instructions surrounding and south of the Lunar Module landing site.
- Map A11 - Exhibits two specific areas of handwritten Hasselblad camera lens and angle instructions, including hand-drawn ridge and ray photographic obstacles. Also present in the upper-left corner is the Julius Caesar crater, an 85km wide lava-flooded lunar impact crater with a low, irregular, and heavily worn wall, named after Roman Dictator Julius Caesar.
- Map A12 - Exhibits the Apollo 15 landing site of Hadley Rille, clearly indicated with an arrow in the lower-right corner. Also highlighted by hand is an area of photographic interest, D Caldera, just south of Hadley Rille.
- Map A13 - Exhibits numerous handwritten and drawn photographic instructions forming a clear sequence of events covering the primary area of interest in the region, Copernicus crater, named after the famous Renaissance astronomer Nicolaus Copernicus. Also present is a handwritten impact area west of the crater, reading "May 13, 1972, Impact 100m, Bright Halo Crater."
- Map A14 - Exhibits the Apollo 16 SIVB impact site in the lower-left corner, boldly hand-written and highlighted with "Apollo 16 SIV-B Impact 40m Dark Halo Crater." Also present in the Kepler crater range is a handwritten photography instruction.
- Map A15 - Exhibits numerous handwritten and drawn photographic instructions forming a clear sequence of events to be taken from the Suess crater to the Reiner R crater to a specific circled area over the Ocean of Storms.
- Map A16 - Exhibits the Darwin crater, a walled plain lunar impact crater named after the naturalist, geologist, and biologist Charles Darwin, famously known for his Theory of Evolution. Also present is a handwritten instruction east of the Grimaldi crater.
- Map A17 - Exhibits a printed 1:2,750,000 scale south of the Lake of Autumn crater and the Darwin B crater in the lower-left corner of the map, also named for Charles Darwin.
- Map A18 - Exhibits boldly printed 80mm and 250mm photographic Hasselblad camera tilt instructions over the Rook Mountains, a ring-shaped mountain range that lies along the western limb of the Moon, crossing over to the far side, completely encircling Mare Orientale.
- Map A19 - Exhibits a printed 1:2,750,000 scale and boldly printed Hasselblad camera tilt instructions. Also present in the top-right corner is Lucretius crater, a relatively fresh impact, with the well-defined rim and interior remaining nearly unscathed from impact erosion.
- Map A20 & 21 - Combined map featuring the sextant photography shutter speed chart, detailing the Hasselblad camera lens configuration. A handwritten Hasselblad camera instruction is also present north of the chart, providing clear relevance to the chart below, as well as the Barringer crater in the top-left corner, a lunar impact crater that is located on the southern hemisphere on the Far side of the Moon, named after geologist Daniel Barringer.
- Map A22 - This chart map exhibits numerous hand-circled craters of photographic interest such as Doppler, Crookes, and the Sniadecki trio, as well as handwritten photography routes, Hasselblad camera lens, and angle instructions. The map exhibits the taped horizontal separation that held the entire chart together. This chart can come attached to A20 & 21 or A1.
Purchasing Multiple Chart Maps:
If you would like to purchase multiple maps and do not want them separated into individual plates (i.e., A5 & A6 adjoining), please send an email to richard@thespacecollective.com after placing your order, and we will arrange for the chart map to be sent to you joined together. Please note that all adjoining maps are in sequence (i.e., A1, A2, etc.) except for A1, which can be paired with A2 or A22. All other maps can join to their corresponding section, i.e., A5 connects to A4 & A6.
Condition Report:
Each chart map is in pristine condition with minor tape marks on the reverse from the original tape sections used to hold the chart together to provide stability during mission use. Minor tape bleedthrough is present on maps A3, A5, A7, A11, A15, A17, A19, A21, and A22 but does not detract from the overall aesthetic.
Authentication Information:
These Apollo 17 flown chart maps came from the collection of Mission Commander Gene Cernan. One section (A1) of the chart is hand-signed and flight-certified in blue felt tip, "Flown on Apollo XVII / Gene Cernan." The chart is identified in the legend box and bears the serial numbers "SKB 32100123-377, S/N 1001," which correspond with those found in the Apollo 17 stowage list, which will also be included with each map plate.
Lifetime Guarantee of Authenticity:
All of our artifacts are thoroughly and extensively researched before being listed for sale, so much so that we're proud to offer a lifetime guarantee of authenticity for this and other artifacts listed on our website. We also hold a record of every piece we sell, which can be identified and searched in our online database using the serial number listed on your certificate of authenticity.


